Uploading images to Catalyst Cloud

Please make sure you have converted your image to RAW before uploading it to our cloud.

Via the command line tools

Warning

If the Image you are trying to upload is larger than 5GB you must use the OpenStack CLI to upload it to the cloud. This is due to a cap being placed for uploads via our dashboard.

Ensure that you have the OpenStack command line tools installed and that you have sourced an openrc file, as explained in the CLI tools and SDKs section.

To upload the converted image to Catalyst Cloud:

$ openstack image create --disk-format raw --container-format bare --file raw-image.raw --private test-image
+------------------+----------------------------------------------------------------------------------------------------------+
| Field            | Value                                                                                                    |
+------------------+----------------------------------------------------------------------------------------------------------+
| checksum         | 84add06465aa22360xxxxxx0f90699be                                                                         |
| container_format | bare                                                                                                     |
| created_at       | 2017-08-22T01:17:58Z                                                                                     |
| disk_format      | raw                                                                                                      |
| file             | /v2/images/2442ee5a-ddd4-4b7d-b08f-xxxxxxxxxxxx/file                                                     |
| id               | 2442ee5a-ddd4-4b7d-b08f-xxxxxxxxxxxx                                                                     |
| min_disk         | 0                                                                                                        |
| min_ram          | 0                                                                                                        |
| name             | test-image                                                                                               |
| owner            | b24exxxxxxxxxxxxxxxxxxxxxxxxxc6f                                                                         |
| properties       | direct_url='rbd://b08xxxxx-xxxx-xxxx-a84c-xxxxxxxxxxxx/images/2442ee5a-ddd4-4b7d-b08f-xxxxxxxxxxxx/snap' |
| protected        | False                                                                                                    |
| schema           | /v2/schemas/image                                                                                        |
| size             | 8589934592                                                                                               |
| status           | active                                                                                                   |
| tags             |                                                                                                          |
| updated_at       | 2017-08-22T01:30:26Z                                                                                     |
| virtual_size     | None                                                                                                     |
| visibility       | private                                                                                                  |
+------------------+----------------------------------------------------------------------------------------------------------+

Via our dashboard

On the images panel, click on “Create Image”. The Create Image dialogue will be displayed as shown below:

../_images/image-create.png
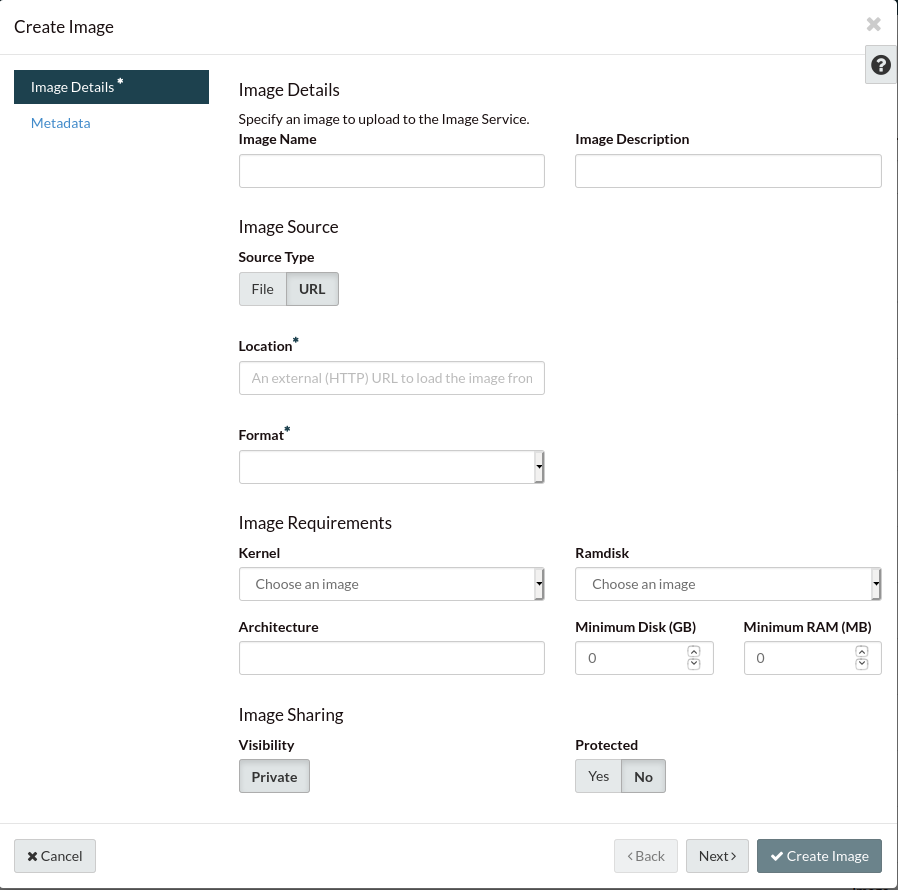
  1. On the image source, select “Browse” to upload an image from your file system.

  2. Select the appropriate format for your image. We strongly recommend the use of RAW images only.

  3. Set the minimum disk size to at least the size of the image. If you are using a compressed format, like QCOW2, use the expanded size of the image.

Finally, click on “Create Image” and wait until the image has been uploaded.