Resizing an instance
The resize operation can be used to change the flavor (increase or decrease the
amount of CPU and RAM, or change the type) of a compute instance.
Warning
The resize operation will shutdown the virtual server, as the effect of
changing vCPUs, RAM, or type requires a full restart of the virtual
server. If you need to scale your application without downtime, consider
scaling it horizontally (add/remove compute instances) as opposed to
vertically (add/remove resources to an existing instance).
Via the dashboard
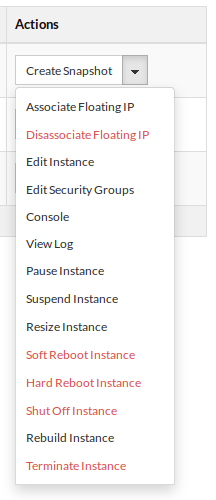
To resize a compute instance, go to the Instances panel on the dashboard and
locate the instance to be resized. On the Actions column, click on the downward
arrow to list more actions and then click on Resize Instance as shown below:
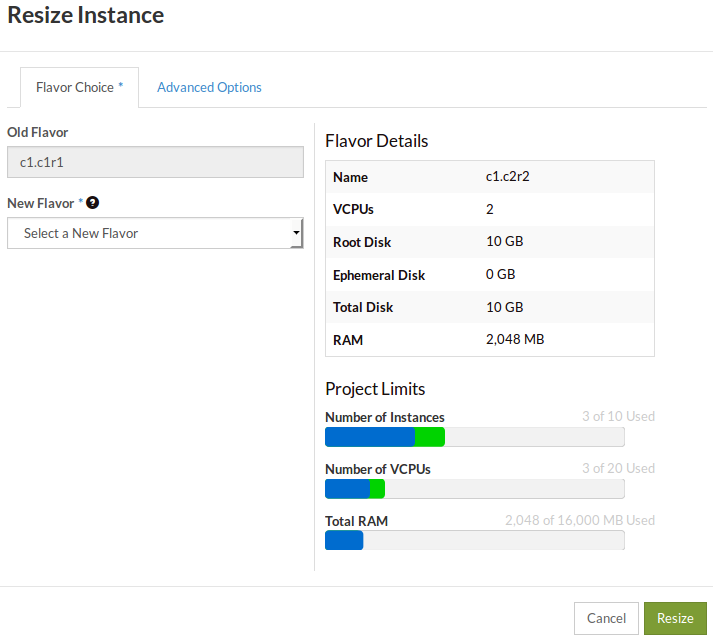
The resize dialogue will pop up, allowing you to chose a new flavor.
Note
Before resizing down a compute instance, please consider if you need to
change the configuration of your applications, so they can start up with less
resources. For example: databases and Java virtual machines are often
configured to allocate a certain amount of memory and will fail to start if not
enough memory is available.
The status of the instance will change to preparing to resize or migrate,
resized or migrated and finally “Confirm or Revert Resize/Migrate” as shown
below:

Once the resize operation has been completed, our cloud will prompt you to
confirm or revert the resize operation. Click on confirm to finish the resize
operation.
Via the command line
Before continuing, make sure that you have sourced an OpenRC file so that you
are able to interact with your project via the command line. If you are not
sure how to download or source your OpenRC file, you can follow the
guide from earlier in this documentation.
Once you have sourced your OpenRC file, we can begin gathering the
necessary info for our resize command. The first step is finding the ID of the
new flavor we want our instance to have:
# The results of the following command have been truncated for brevity
$ openstack flavor list

+--------------------------------------+------------+--------+------+-----------+-------+-----------+
| ID                                   | Name       |    RAM | Disk | Ephemeral | VCPUs | Is Public |
+--------------------------------------+------------+--------+------+-----------+-------+-----------+
| 01d5b414-14d5-4349-b823-xxxxxxxxxxxx | c1.c4r32   |  32768 |   10 |         0 |     4 | True      |
| 02d12ad8-badc-4a41-9dae-xxxxxxxxxxxx | c1.c1r4    |   4096 |   10 |         0 |     1 | True      |
| 0f3be84b-9d6e-44a8-8c3d-xxxxxxxxxxxx | c1.c16r16  |  16384 |   10 |         0 |    16 | True      |
| 0f513d82-ffa0-4141-a98e-xxxxxxxxxxxx | c1.c2r6    |   6144 |   10 |         0 |     2 | True      |
| 11a1966e-4193-4763-8148-xxxxxxxxxxxx | c1.c8r24   |  24576 |   10 |         0 |     8 | True      |
| 1c199662-65bd-4fbe-aece-xxxxxxxxxxxx | c1.c8r64   |  65536 |   10 |         0 |     8 | True      |
| 22afd80c-6a5e-49e6-a2c9-xxxxxxxxxxxx | c1.c4r2    |   2048 |   10 |         0 |     4 | True      |
| 2772d378-c1c3-464c-83b9-xxxxxxxxxxxx | c1.c4r4    |   4096 |   10 |         0 |     4 | True      |
| 2ba44887-5fe3-44cc-8bca-xxxxxxxxxxxx | c1.c2r2    |   2048 |   10 |         0 |     2 | True      |
| 374fc408-7a30-483c-a8ce-xxxxxxxxxxxx | c1.c32r16  |  16384 |   10 |         0 |    32 | True      |
| 3d11be79-5788-4d70-9058-xxxxxxxxxxxx | c1.c1r05   |    512 |   10 |         0 |     1 | True      |
| 3df41a1b-fe84-4876-a1ef-xxxxxxxxxxxx | c1.c16r24  |  24576 |   10 |         0 |    16 | True      |
| 5643df3f-7a6d-476d-b035-xxxxxxxxxxxx | c1.c32r96  |  98304 |   10 |         0 |    32 | True      |
| 589b9451-ccc9-4b4c-b6c8-xxxxxxxxxxxx | c1.c32r256 | 262144 |   10 |         0 |    32 | True      |
| 59ae6d98-aee7-4595-8bf0-xxxxxxxxxxxx | c1.c2r8    |   8192 |   10 |         0 |     2 | True      |
| 5eb576f1-3f61-4121-a5a5-xxxxxxxxxxxx | c1.c4r6    |   6144 |   10 |         0 |     4 | True      |
| 5ff0b09b-684c-4212-8edc-xxxxxxxxxxxx | c1.c2r4    |   4096 |   10 |         0 |     2 | True      |
| 6104d093-4c74-4493-adb9-xxxxxxxxxxxx | c1.c8r32   |  32768 |   10 |         0 |     8 | True      |
| 6371ec4a-47d1-4159-a42f-xxxxxxxxxxxx | c1.c1r1    |   1024 |   10 |         0 |     1 | True      |
| a18d0408-f2cb-410d-a941-xxxxxxxxxxxx | c1.c1r2    |   2048 |   10 |         0 |     1 | True      |
| ...                                  |            |        |      |           |       |           |
+--------------------------------------+------------+--------+------+-----------+-------+-----------+
For this example we will be resizing our instance from c1.c1r1 to the c1.c1r2
flavor. For more information on flavors, their naming convention and purpose,
please refer to the previous page in this section:
launching a compute instance.
We will now create an environment variable for our flavorID and for the
the instance we want to resize:
# First, we get our current instance's ID by using the following:
$ openstack server list

+--------------------------------------+------------------------+---------------+--------------------------+------------------------------+---------+
| ID                                   | Name                   | Status        | Networks                 | Image                        | Flavor  |
+--------------------------------------+------------------------+---------------+--------------------------+------------------------------+---------+
| c097f22f-48be-48ea-b664-xxxxxxxxxxxx | resizing-instance-test | Running       | private-net-1=10.0.0.194 | N/A (booted from volume)     | c1.c1r1 |
+--------------------------------------+------------------------+---------------+--------------------------+------------------------------+---------+

# Now taking both our instance ID and the flavor ID from before, we create the following variables
$ instanceID=c097f22f-48be-48ea-b664-xxxxxxxxxxxx
$ flavorID=a18d0408-f2cb-410d-a941-xxxxxxxxxxxx
With our variables now taken care of, we can proceed with constructing our
resize command. The basic structure of the command is
openstack server resize <instance> --flavor. So for our example it will
look like this:
$ openstack server resize $instanceID --flavor $flavorID
Like the dashboard example, the resize command is split into two parts, one to
perform the resize and another to confirm that the resize was successful so
that the old instance may be released.
Before we confirm our resize, we have to wait for the status of our instance to
change to: VERIFY_RESIZE. You can check the status of your instance using
the following:
$ openstack server list
+--------------------------------------+------------------------+-------------------+--------------------------+------------------------------+---------+
| ID                                   | Name                   | Status            | Networks                 | Image                        | Flavor  |
+--------------------------------------+------------------------+-------------------+--------------------------+------------------------------+---------+
| c097f22f-48be-48ea-b664-xxxxxxxxxxxx | resizing-instance-test | VERIFY_RESIZE     | private-net-1=10.0.0.194 | N/A (booted from volume)     | c1.c1r1 |
+--------------------------------------+------------------------+-------------------+--------------------------+------------------------------+---------+
Once our instance has the VERIFY_RESIZE status, we use the following to
confirm our resize:
$ openstack server resize confirm $instanceID

# We can then confirm that our instance has been resized by 'showing' our instance and looking at the flavor

$ openstack server show $instanceID
+-----------------------------+----------------------------------------------------------+
| Field                       | Value                                                    |
+-----------------------------+----------------------------------------------------------+
| OS-DCF:diskConfig           | AUTO                                                     |
| OS-EXT-AZ:availability_zone | nz-hlz-1                                                 |
| OS-EXT-STS:power_state      | Running                                                  |
| OS-EXT-STS:task_state       | None                                                     |
| OS-EXT-STS:vm_state         | active                                                   |
| OS-SRV-USG:launched_at      | 2020-10-26T23:02:43.000000                               |
| OS-SRV-USG:terminated_at    | None                                                     |
| accessIPv4                  |                                                          |
| accessIPv6                  |                                                          |
| addresses                   | private-net-1=10.0.0.194                                 |
| config_drive                |                                                          |
| created                     | 2020-10-21T01:28:55Z                                     |
| flavor                      | c1.c1r2 (a18d0408-f2cb-410d-a941-xxxxxxxxxxxx)           |
| hostId                      | bf7da04283554bf5aaa8fcf1252c1d391709777c0cc420ac4b6aa762 |
| id                          | c097f22f-48be-48ea-b664-xxxxxxxxxxxx                     |
| image                       | N/A (booted from volume)                                 |
| key_name                    | resize-instance-key                                      |
| name                        | resizing-instance-test                                   |
| progress                    | 0                                                        |
| project_id                  | XXXXXXXXXXXXXXXXXXXXXXXXXXXXXXXXXX                       |
| properties                  |                                                          |
| security_groups             | name='default'                                           |
|                             | name='security-group'                                    |
| status                      | ACTIVE                                                   |
| updated                     | 2020-10-26T23:38:10Z                                     |
| user_id                     | 53b94a52e9dcxxxxxxx0079a9a3d6434                         |
| volumes_attached            | id='8b661df3-f5f2-429c-9be6-xxxxxxxxxxxx'                |
|                             | id='dae41bf1-7b33-430b-b4ae-xxxxxxxxxxxx'                |
+-----------------------------+----------------------------------------------------------+